POS Foundation
POS Foundation provides a proof-of-concept open source framework (opens in a new tab) for building point-of-sale (POS) checkout interfaces that serve BigCommerce merchants with physical locations. It provides a template for custom POS solutions that use secure, pre-certified EMV card readers. POS Foundation's default integration with Stripe Terminal can significantly accelerate development time.
POS Foundation scaffolds manual connector apps that use store-level API accounts. You do not need to create an app profile or use ngrok. The app will not appear in the store control panel and is only accessible to computers running on the same local network as the app's server. In contrast to Subscription Foundation-derived apps, POS Foundation apps do not create their own dedicated sales channels. If you're interested in contributing to this package, see Contributing.
Software requirements
- Node.js (opens in a new tab) 18.0.0+
- The npm (opens in a new tab) package manager
- A MongoDB database instance; this guide uses MongoDB Cloud (opens in a new tab)
Hardware requirements
- A Stripe Terminal-enabled card reader (opens in a new tab)
- A card reader-compatible device to run the POS system
Configure accounts
Account configuration requirements
We recommend that you use a sandbox store that has the same multi-storefront status as the production store. For example, if you're developing for a multi-storefront-enabled merchant store, use a multi-storefront sandbox. For information on configuring multi-storefront, see Multi-Storefront (opens in a new tab).
To configure your accounts, complete the following steps:
-
To develop and test safely, you need a BigCommerce sandbox store. If you don't have one, Create a Sandbox Store.
-
In the control panel of your sandbox store, create a store-level API account and add the following OAuth scopes:
| UI Name | Permission | Parameter |
|---|---|---|
| Customers | modify | store_v2_customers |
| Information & settings | read-only | store_v2_information_read_only |
| Orders | modify | store_v2_orders |
| Create payments | create | store_payments_access_token_create |
| Get payment methods | read-only | store_payments_methods_read |
| Products | read-only | store_v2_products_read_only |
| Carts | modify | store_cart |
| Checkouts | modify | store_v2_checkouts |
| Channel Settings | modify | store_channel_settings |
| Storefront API Tokens | manage | store_storefront_api |
Record the API account credentials
- Record the access token, client ID, and client secret in a safe place. In a later step, you will update the .env file and specify these credentials as the values of the
BC_AUTH_TOKEN,BC_APP_CLIENT_ID, andBC_APP_SECRETenvironment variables. - In addition, make note of the store hash. It is the path parameter that immediately precedes
v3in theAPI PATHincluded with your store API account. In a later step, you will specify the store hash as the value of theBC_STORE_HASHenvironment variable.
Fork and install the source repository
To fork the repository, complete the following steps:
- Fork the point-of-sale-foundation repository (GitHub) (opens in a new tab) to your GitHub account.
- Clone the fork to your local development environment.
- Navigate to the root directory of your cloned repository and install the default packages by running the following command:
npm installConfigure Stripe
To develop the POS interface, you need to create and configure a Stripe account.
To configure the Stripe account to connect with your implementation, complete the following steps:
-
To create the Stripe account, sign up with Stripe (opens in a new tab).
-
Sign in to the Stripe Dashboard (opens in a new tab).
-
In the top right corner of your Stripe Dashboard, click Test Mode and verify that Test mode (opens in a new tab) is selected.

- Select API keys in the left menu, then locate the Standard keys section of the page. In the Secret key table row, click Reveal test key and copy the string that appears.
Record the Stripe secret key
Record the secret key and keep it in a safe location. In a later step, you will update the .env file and specify the secret key as the value of the STRIPE_SECRET_KEY environment variable.
-
On your Stripe Dashboard (opens in a new tab), click More > Terminal to enable Stripe Terminal (opens in a new tab).
-
When prompted to configure Stripe Terminal, click Get Started.
-
Click Locations in the left menu, then click the + New button at the top right of the Locations section.
-
In the Create location dialog, enter a Name and an Address, then click Save.
-
To add a reader to the new location, click on the row that lists the location, then click the + New button at the top right of the Readers section.
-
In the Register reader dialog, enter the Registration code and a Reader label, then click Save.
Configure the BigCommerce store
After you successfully configure Stripe, configure your BigCommerce sandbox store in the store control panel.
To configure the store to make purchases using the POS interface, complete the following steps in the BigCommerce store control panel:
-
Configure a shipping zone with a Pickup in Store shipping method; for directions, see our support article on Setting up an "In-Store Pickup" Shipping Method (opens in a new tab).
-
Ensure that your store is using Optimized One-Page Checkout; for directions, see our support article on Switching to Optimized One-Page Checkout (opens in a new tab). Learn more about Optimized One-Page Checkout Settings (opens in a new tab).
-
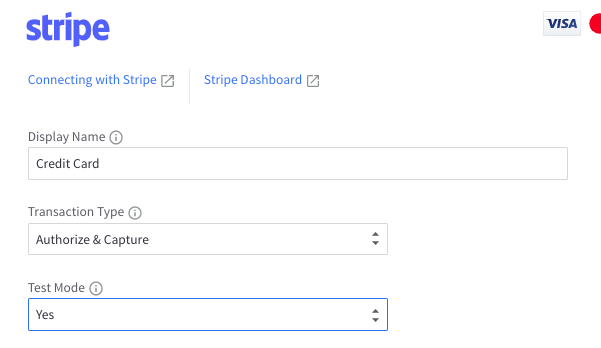
Connect the sandbox store with the Stripe account you configured in the previous section; for directions, see our support article on Setting up Stripe (opens in a new tab).
-
In the Stripe settings section (opens in a new tab), locate the Test Mode dropdown and select Yes.
Create and configure the database
POS Foundation uses MongoDB as a database engine. If you want to use a different data store, you'll need to modify the Prisma configuration, migration, and seed files. To learn more, see Prisma's list of database connectors (opens in a new tab).
To configure your POS implementation to use MongoDB, complete the following steps:
-
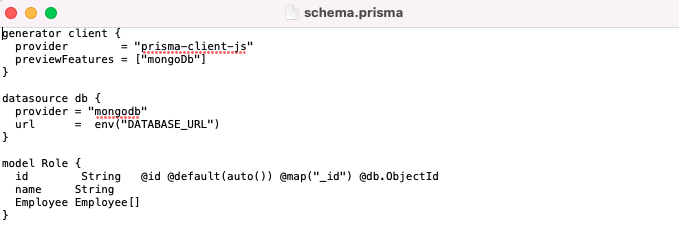
On your computer, navigate to the fork of the project repository, and locate the
/prismadirectory. -
In the
/prisma/schema.prismasettings file, setprovidertomongodb.
Configure MongoDB Cloud
After you configure your application to use MongoDB, connect to a MongoDB instance. You can use MongoDB Cloud to get your implementation up and running quickly. As an added benefit, MongoDB Cloud makes your data collections accessible from anywhere.
To configure MongoDB Cloud and generate a connection URL, complete the following steps:
-
Navigate to MongoDB Cloud (opens in a new tab) and sign in (opens in a new tab) or sign up (opens in a new tab) for an account.
-
From the left menu, select Database Access, then click Add New Database User.
a. For Authentication Method, select Password.
b. Enter a username and password. Leave all other information unchanged.
c. To save, click Add User.
-
From the left menu, select Network Access, then click Add IP Address.
a. For Access List Entry, enter an IP address. Using
0.0.0.0/0allows you to connect from anywhere, but is not secure in production. To learn more, consult MongoDB's IP access documentation (opens in a new tab).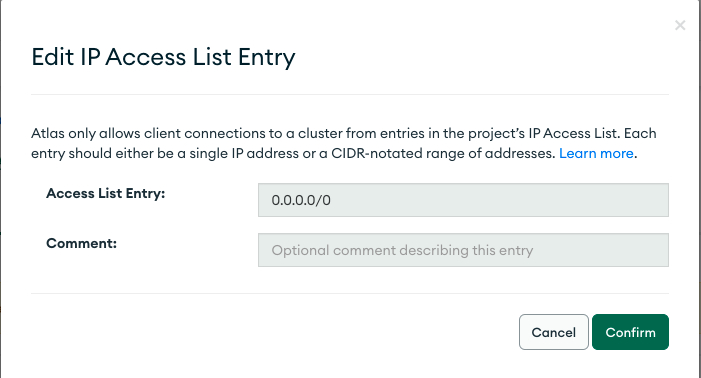
b. To save, click Confirm.
-
From the left menu, select Database.
a. Locate your running cluster, then click Connect.
b. In the dialog that opens, click Connect your application.
c. Copy the connection string that appears, and replace
<username>and<password>with the values you specified in step 2b. Add myFirstDatabase to the connection string so that it resembles the following example:
mongodb+srv://<username>:<password>@cluster0.sdfdfg65.mongodb.net/myFirstDatabase?retryWrites=true&w=majority
Record the connection string
Record the MongoDB Cloud connection string and keep it in a safe location. In a later step, you will update the .env file and specify the connection string as the value of the DATABASE_URL environment variable.
Declare environment variables
After you create and configure the database, you have all the information you need to add environment variables to your project.
To declare environment variables, complete the following steps:
-
Create a
.envfile in the root directory of your project. -
Copy the contents of
.env.sampleto.envwith the following command:
cp .env.sample .env- Open the
.envfile you just created and update the following environment variables:
| Environment variable | Description | Reference location |
|---|---|---|
BC_STORE_HASH | The unique string that identifies your store | Configure accounts |
BC_AUTH_TOKEN | The store API account's access token | Configure accounts |
BC_APP_CLIENT_ID | The store API account's client ID | Configure accounts |
BC_APP_SECRET | The store API account's client secret | Configure accounts |
STRIPE_SECRET_KEY | The Stripe account's secret key | Configure Stripe |
DATABASE_URL | The database connection string | Create and configure the database |
BC_CHANNEL_ID | Modify this value if you create a dedicated channel for the POS system | Create a channel (API Reference) |
BC_GQL_URL | The URL of the store's GraphQL Storefront API endpoint | See notes in the .env.sample file (GitHub) (opens in a new tab) |
Run migration and start the server
After you add environment variables to your project, run the migration script that creates the initial collections and documents your MongoDB instance needs to run the POS system.
To run the migration script and seed the database, complete the following steps:
- Run the Prisma migration script that is pre-defined in
/prisma/migrations/*with the following command:
npx prisma db push- Seed your database with pre-configured collections and documents using the following command:
npm run seed- Generate a new Prisma client with the following command:
npx prisma generateSuccessfully generating the Prisma client relies on the provider settings you configured in the preceding section on [creating and configuring the database](#create- and-configure-the-database).
- Access the database to verify you have created the collections and documents correctly. You can use the following command, or connect with a GUI, such as Compass (opens in a new tab).
npx prisma studio- To start the server that runs the POS system, run the following command:
npm run devWhen the preceding script runs successfully, the app is running locally.
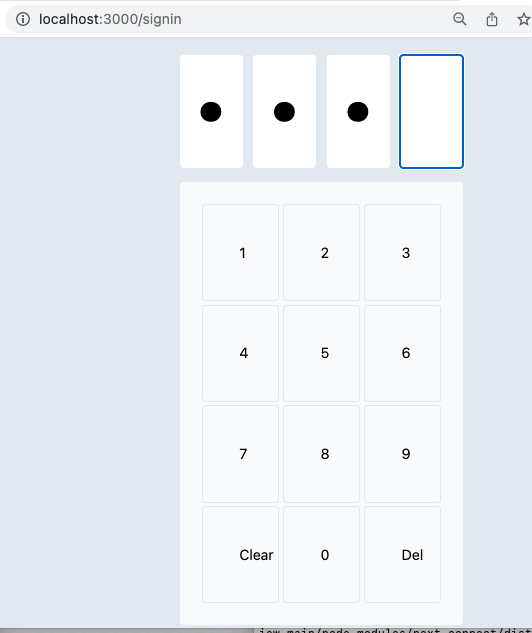
- Sign in to the app as an admin at
http://localhost:3000/signin. The default admin PIN in the seed data is1234.
- After you access Prisma Studio, navigate to the Settings view to save your store address, which the app uses for checkout tax calculations. If you fail to supply the store address, you will receive an unhandled runtime error.
Connect the POS to an EMV card reader
After you start the server and sign in to the app, connect the device running the POS with one of your Stripe account's pre-certified EMV card readers.
To connect the POS with a card reader, complete the following steps:
-
To set up one or more pre-certified Stripe Terminal card readers, follow Stripe's directions to Set up your reader (opens in a new tab).
-
Locate the tablet, phone, computer, or other device you want to use to take payment at checkout. Connect it to the local network that's running your application and sign in at
http://localhost:3000/signin. -
To scan the local network for Stripe Terminal card readers connected with your account, navigate to the main register view. Click or press the Wifi icon.
-
In the list of card readers that appears, locate the reader you want to connect. Click or press Connect.
Troubleshooting
Issue: Environment variable not found when running the database migration
This error can occur when the /prisma/schema.prisma file contains the incorrect provider, or the .env file contains an incorrect DATABASE_URL. Verify that the information in both files is correct.
Issue: A "no available servers" server selection timeout occurs when running the database migration
Change your MongoDB Cloud IP address to 0.0.0.0/0, or consult MongoDB's IP access documentation (opens in a new tab) for alternatives.
Contributing
Want to help expand this foundation? We'd love to hear from you. Submit a pull request, and consider joining the BigCommerce Developer Community Slack workspace (opens in a new tab) to connect with us.
Resources
- Point of Sale Foundation README (GitHub) (opens in a new tab)
- Introducing the Point of Sale Foundation (Dev Blog) (opens in a new tab)
- Create a Sandbox Store
- Create a Store-level API Account
- Connecting with Stripe (opens in a new tab)
- Setting up an "In-Store Pickup" Shipping Method (opens in a new tab)
- Switching to Optimized One-Page Checkout (opens in a new tab)
External resources
- Stripe Terminal (opens in a new tab)
- Set up Stripe Terminal reader (opens in a new tab)
- MongoDB Cloud (opens in a new tab)
- MongoDB Cloud IP access list (opens in a new tab)
- Compass MongoDB GUI (opens in a new tab)
- Prisma database connectors (opens in a new tab)