Step 1: Set up Your Local Environment
Start by setting up your local development environment.
Install Node
For this tutorial, you need Node.js version 18+. To check your version of Node.js, run the following command in your terminal:
node -vIf you do not have Node.js installed, you can download it from nodejs.org (downloads) (opens in a new tab).
Set up a project directory
-
Create a new project directory.
-
Navigate to the directory using the terminal.
Generate a package.json file
- To create the project's
package.jsonfile, enter the interactive initialization sequence (opens in a new tab). Run the following command in the terminal:
npm initPress enter to continue prompts.
To write a package.json file with default values, run npm init -y instead. Descriptive fields will be blank.
Install npm packages
- Install
big-design,big-design-icons,big-design-theme,dotenv,next,react,react-dom, andstyled-components.
npm install --save @bigcommerce/big-design @bigcommerce/big-design-icons @bigcommerce/big-design-theme dotenv next react react-dom styled-components- Install dev dependencies.
npm install --save-dev babel-plugin-styled-components @types/node @types/react @types/react-dom @types/styled-components typescriptbabel-plugin-styled-components (opens in a new tab) is a supplement to the styled-components library that, among other things, offers improved debugging and minification of styles.
@types/node (opens in a new tab) and @types/react (opens in a new tab) contain TypeScript type definitions for Node.js and React.js respectively.
View tested package versions
You can view a list of all the tested package versions in the package.json file on the Step 1 branch (opens in a new tab) of this sample app's repo.
Add scripts
-
Open
package.jsonin your text editor. -
Update the
scriptsproperty, by adding thedev,build, andstartscripts.
{
  ...
  "scripts": {
    "dev": "next",
    "build": "next build",
    "start": "next start -p $PORT",
    "test": "echo \"Error: no test specified\" && exit 1"
  }
}- Save your changes.
Add the node and npm engines
-
Open
package.jsonin your text editor. -
Add an
enginesproperty with the following values:
{
  ...
  "engines": {
    "node": ">=16 <20",
    "npm": ">=8 <10"
  },
}- Save your changes.
Create a starter page
-
In the root directory of your project, create a
pagesfolder. -
In the
pagesfolder, create anindex.tsxfile. This is your app's homepage. -
Open
index.tsxin your code editor. -
Add
PanelandTextBigDesign imports at the top of the file.
import { Panel, Text } from '@bigcommerce/big-design';The Panel component allows you to contain content in a structured format. To learn more about the BigDesign's Panel component, see Panel Developer Docs (opens in a new tab).
Text is one of the many predefined typography components in BigDesign. BigDesign offers multiple properties to customize the typographic palette. To view available typography components, see Typography (opens in a new tab).
- Add the
Indexfunctional component below the import statements. You can view index.tsx (GitHub) (opens in a new tab).
const Index = () => (
    <Panel header="Homepage" margin="xxLarge">
        <Text>Hello world</Text>
    </Panel>
);

export default Index;
Next.js associates each file in the pages folder with a route based on the file's name. Consequently, the Index React component you exported in pages/index.tsx will be accessible at /index.
Initialize BigDesign
Next.js allows you to use a theme provider and import CSS files from node_modules. In this tutorial, you integrate BigDesign React components (opens in a new tab) to give your app a distinct BigCommerce look and feel.
-
Next.js uses the
Appcomponent to initialize pages. To override the defaultAppcomponent, add the_app.tsxfile to thepagesfolder. This is where you initialize BigDesign. -
Open
_app.tsxand importGlobalStylesfrom BigDesign andAppPropsfrom Next.js.
import { GlobalStyles } from '@bigcommerce/big-design';
import type { AppProps } from 'next/app'
Importing the GlobalStyles component will set BigCommerce's base styles globally.
- Add the
MyAppfunctional component below the import statements. You can view _app.tsx (GitHub) (opens in a new tab).
const MyApp = ({ Component, pageProps }: AppProps) => (
   <>
       <GlobalStyles />
       <Component {...pageProps} />
   </>
);

export default MyApp;
The Component prop represents the active page. Consequently, it will change when you navigate between routes.
Initialize styled-components
Because BigDesign uses styled-components, we need to add additional configuration for both BigDesign and styled-components to function properly.
-
Add a custom
_document.tsxfile to your pages folder. -
Import
DocumentandDocumentContext, the built-in TypeScript types, from Next.js.
import Document, { DocumentContext } from 'next/document';- Import
ServerStyleSheetfrom styled-components.
import { ServerStyleSheet } from 'styled-components';- Extend the
Documentclass. You can view _document.tsx (GitHub) (opens in a new tab).
export default class MyDocument extends Document {
  static async getInitialProps(ctx: DocumentContext) {
    const sheet = new ServerStyleSheet();
    const originalRenderPage = ctx.renderPage;

    try {
      ctx.renderPage = () =>
        originalRenderPage({
          enhanceApp: (App) => (props) => sheet.collectStyles(<App {...props} />),
        })

      const initialProps = await Document.getInitialProps(ctx);

      return {
        ...initialProps,
        styles: (
          <>
            {initialProps.styles}
            {sheet.getStyleElement()}
          </>
        ),
      };
    } finally {
      sheet.seal();
    }
  }
}
Start the development server
- Using the terminal, open the root directory of your app and start the development server.
npm run dev- Open
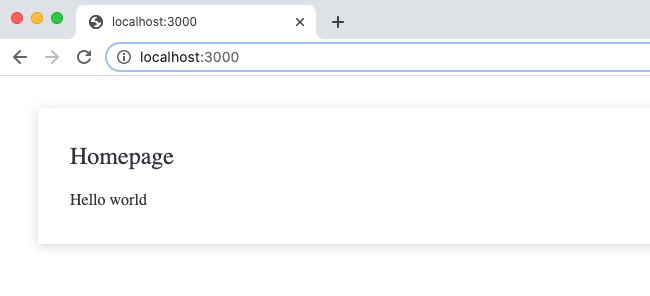
http://localhost:3000from your browser. You should see the text “Hello world” displayed under Homepage.

Next: Connect Your App to BigCommerce