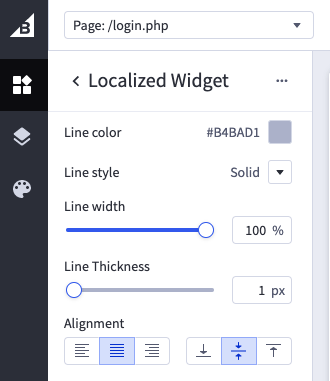
Localizing Widget Template Settings
You can localize widget template settings to the provided language translations using the internationalization (i18n) system.
This article explains how to localize your widget template settings and provides a practical example of how to map settings to translations.
Mapping settings to translations
The widget template schema uses the i18n.{SettingName} internationalization format within labels to map settings to translation files. i18n's interpolation functionality makes it possible to integrate dynamic values into translations.
You can localize your widget template settings by defining translations in the schema_translations property of the widget template schema.
Localization example
The following example demonstrates how to add translations for the widget template settings using the schema_translations property.
- Identify all settings that need a translation. Each
labelvalue must start with thei18n.prefix. For example,"label": "i18n.LineColor". - Prepare your schema translations JSON object. It must contain a default language code along with the other languages you want to support formatted by two lowercase letters, a dash, and at least two alphanumeric characters. For more information, see the Supported language code schemes section below.
{
 "i18n.LineColor": {
   "default": "Line color",
   "fr-FR": "Couleur de la ligne",
   "en": "Line color",
   "zh-CN": "线条颜色"
 },
 "i18n.LineStyle": {
   "default": "Line style",
   "fr-FR": "Style de ligne",
   "en": "Line style",
   "zh-CN": "线型"
 },
 "i18n.LineWidth": {
   "default": "Line width",
   "fr-FR": "Largeur de ligne",
   "en": "Line width",
   "zh-CN": "行宽"
 },
 "i18n.LineThickness": {
   "default": "Line Thickness",
   "fr-FR": "Épaisseur de ligne",
   "en": "Line Thickness",
   "zh-CN": "线的粗细"
 },
 "i18n.Alignment": {
   "default": "Alignment",
   "fr-FR": "Alignement",
   "en": "Alignment",
   "zh-CN": "结盟"
 }
}- Stringify your data structure. You will pass it as a value to
schema_translationsin the next step.
"{\n \"i18n.LineColor\": {\n \"default\": \"Line color\",\n \"fr-FR\": \"Couleur de la ligne\",\n \"en\": \"Line color\",\n \"zh-CN\": \"线条颜色\"\n },\n \"i18n.LineStyle\": {\n \"default\": \"Line style\",\n \"fr-FR\": \"Style de ligne\",\n \"en\": \"Line style\",\n \"zh-CN\": \"线型\"\n },\n \"i18n.LineWidth\": {\n \"default\": \"Line width\",\n \"fr-FR\": \"Largeur de ligne\",\n \"en\": \"Line width\",\n \"zh-CN\": \"行宽\"\n },\n \"i18n.LineThickness\": {\n \"default\": \"Line Thickness\",\n \"fr-FR\": \"Épaisseur de ligne\",\n \"en\": \"Line Thickness\",\n \"zh-CN\": \"线的粗细\"\n },\n \"i18n.Alignment\": {\n \"default\": \"Alignment\",\n \"fr-FR\": \"Alignement\",\n \"en\": \"Alignment\",\n \"zh-CN\": \"结盟\"\n }\n}"- Create a widget template by sending a
POSTrequest to the Create a Widget Template endpoint. The following example creates a simple text widget:
POST /stores/{{store_hash}}/v3/content/widget-templates
Host: api.bigcommerce.com
X-Auth-Token: {{ACCESS_TOKEN}}
Content-Type: application/json
Accept: application/json

{
  "name": "Translated Text Widget",
  "schema": [
 {
   "type": "tab",
   "label": "Design",
   "sections": [
     {
       "settings": [
         {
           "type": "color",
           "label": "i18n.LineColor",
           "id": "color",
           "default": "rgba(180, 186, 209, 1)"
         },
         {
           "type": "select",
           "label": "i18n.LineStyle",
           "id": "style",
           "default": "solid",
           "typeMeta": {
             "selectOptions" : [
               {
                 "label": "Solid",
                 "value": "solid"
               },
               {
                 "label": "Dashed",
                 "value": "dashed"
               },
               {
                 "label": "Dotted",
                 "value": "dotted"
               }
             ]
           }
         },
         {
          "type": "range",
           "label": "i18n.LineWidth",
           "id": "width",
           "default": 100,
           "typeMeta": {
             "rangeValues": {
               "min": 1,
               "max": 100,
               "step": 1,
               "unit": "%"
             }
           }
         },
         {
          "type": "range",
           "label": "i18n.LineThickness",
           "id": "thickness",
           "default": 1,
           "typeMeta": {
             "rangeValues": {
               "min": 1,
               "max": 10,
               "step": 1,
               "unit": "px"
             }
           }
         },
         {
           "type": "alignment",
           "label": "i18n.Alignment",
           "id": "alignment",
           "default": {
             "horizontal": "center",
             "vertical": "middle"
           },
           "typeMeta": {
             "display": "both"
           }
         }
       ]
     }
   ]
 }
],
  "schema_translations": "{\n \"i18n.LineColor\": {\n   \"default\": \"Line color\",\n   \"fr-FR\": \"Couleur de la ligne\",\n   \"en\": \"Line color\",\n   \"zh-CN\": \"线条颜色\"\n },\n \"i18n.LineStyle\": {\n   \"default\": \"Line style\",\n   \"fr-FR\": \"Style de ligne\",\n   \"en\": \"Line style\",\n   \"zh-CN\": \"线型\"\n },\n \"i18n.LineWidth\": {\n   \"default\": \"Line width\",\n   \"fr-FR\": \"Largeur de ligne\",\n   \"en\": \"Line width\",\n   \"zh-CN\": \"行宽\"\n },\n \"i18n.LineThickness\": {\n   \"default\": \"Line Thickness\",\n   \"fr-FR\": \"Épaisseur de ligne\",\n   \"en\": \"Line Thickness\",\n   \"zh-CN\": \"线的粗细\"\n },\n \"i18n.Alignment\": {\n   \"default\": \"Alignment\",\n   \"fr-FR\": \"Alignement\",\n   \"en\": \"Alignment\",\n   \"zh-CN\": \"结盟\"\n }\n}",
  "template": "<h1>{{textContent}}</h1>"
}-
From the control panel, open Page Builder and locate your newly created widget template.
-
Drag and drop the widget in a region on a page to test it out.

-
Change your store's language settings. You can do so in the control panel by going to My Profile > Edit Profile (opens in a new tab). For this example, we are going to set the language to French.
-
Return to Page Builder and test the widget again. The display language should now be French.

Supported language code schemes
Widget templates support both ISO 639‑1 (opens in a new tab) and IETF language tag (opens in a new tab) code schemes. The language code must follow a set format of two lowercase letters for a two-letter code system or two lowercase letters, a dash, and at least two alphanumeric characters for a multiple-character code system.
- Translations must start with the
i18n.prefix. - Language code must contain a default value.
- You can reuse translations within the widget template schema, but translations within the
schema_translations.jsonfile must be unique.
Resources
- Internationalization (opens in a new tab)
- Page Builder (opens in a new tab)
- User Profile (opens in a new tab)
- Widgets API Overview