Configuring Wallet Buttons
Familiarity with Stencil development
The file structure of each theme can be unique; therefore, some knowledge of Stencil development may be required to render wallet buttons. The examples in this article use the Cornerstone theme.
This article explains how to add wallet buttons to the Product Detail Page, or PDP. Cornerstone 6.7.0+ supports wallet buttons by default; however, you can upgrade older themes to support wallet buttons by following the steps outlined in this article.
Adding wallet buttons
By default, wallet buttons are not enabled on the PDP. To add wallet buttons, you must first prepare your theme by adding a checkbox to Page Builder. The checkbox allows the merchant to control the display of wallet buttons on the PDP on your store. Perform the following steps to add the checkbox:
- In
config.json, add ashow_quick_payment_buttonsproperty and provide a default value.
{
  ...,
  "settings": {
    ...,
    "show_quick_payment_buttons": true
  }
}- To create a checkbox for the merchant to toggle the feature on and off in Page Builder, add the following code to the Products section of
schema.json:
{
  ...,
  {
    "name": "Products",
    "settings": [
      ...,
      {
        "type": "checkbox",
        "label": "Show quick payment buttons",
        "force_reload": true,
        "id": "show_quick_payment_buttons"
      },
      ...,
    ]
  }
}
In Page Builder, the checkbox appears as follows:

Setting quantity of wallet buttons
To set the number of wallet buttons visible on the product page, perform the following steps:
- In
config.json, add apaymentbuttons-number-of-buttonsproperty and provide a default value.
{
  ...,
  "settings": {
    ...,
    "paymentbuttons-number-of-buttons": 1
  }
}- To add a Page Builder dialog for the merchant to configure the number of visible wallet buttons, add the following code to the Payments section of
schema.json:
{
  ...,
  {
    "name": "Payments",
    "settings": [
      ...,
      {
        "type": "heading",
        "content": "Quick payment buttons"
      },
      {
        "type": "select",
        "label": "Number of buttons always visible",
        "force_reload": true,
        "id": "paymentbuttons-number-of-buttons",
        "options": [
          {
            "value": 1,
            "label": "1"
          },
          {
            "value": 2,
            "label": "2"
          }
        ]
      },
      ...
    ]
  }
}
In Page Builder, the dialog appears as follows:

Sorting wallet buttons
Adding a sorting features allows merchants to choose the order in which wallet buttons appear to shoppers. To add a sorting feature, perform the following steps:
- In
config.json, add apaymentbuttons-provider-sortingproperty and provide a default value.
{
  ...,
  "settings": {
    ...,
    "paymentbuttons-provider-sorting": []
  }
}- To add the sorting component to the wallet buttons Page Builder dialog, add the following code to the Payments section of
schema.json:
Adding "heading" for a section can be skipped if it was added before.
{
  ...,
  {
    "name": "Payments",
    "settings": [
      ...,
      {
        "type": "heading",
        "content": "i18n.QuickPaymentButtons"
      },
      {
        "type": "sort",
        "label": "i18n.ProviderSortingOrderLabel",
        "id": "paymentbuttons-provider-sorting",
        "force_reload": true,
        "options": [
          {
            "value": "paypal",
            "label": "i18n.PayPalProviderSortingLabel",
            "enabledBy": "paypal"
          },
          {
            "value": "paypal-credit",
            "label": "i18n.PayPalCreditProviderSortingLabel",
            "enabledBy": "paypal-credit"
          },
          {
            "value": "paypal-venmo",
            "label": "i18n.PayPalVenmoProviderSortingLabel",
            "enabledBy": "paypal-venmo"
          },
          {
            "value": "googlepay",
            "label": "i18n.GooglepayProviderSortingLabel",
            "enabledBy": "googlepay"
          },
          {
            "value": "applepay",
            "label": "i18n.ApplepayProviderSortingLabel",
            "enabledBy": "applepay"
          },
          {
            "value": "amazonpay",
            "label": "i18n.AmazonProviderSortingLabel",
            "enabledBy": "amazonpay"
          },
        ]
      },
      ...
    ]
  }
}
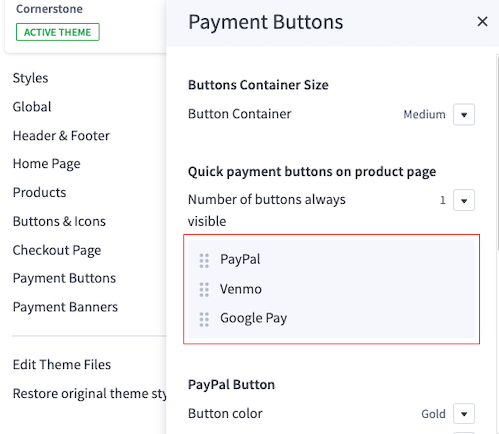
In Page Builder, the dialog appears as follows:

Adding wallet buttons to theme markup
To render wallet buttons, you must perform the preceding steps described in this article. Add wallet buttons, set the quantity of buttons, and sort the buttons as desired, then insert the following code underneath the Add to Cart button on the PDP.
Additional steps may be required depending on your theme's setup.
{{#if this.with_wallet_buttons}}
  {{#if wallet_buttons}}
    <div class="your-class-for-wallet-buttons-list">
      {{{wallet_buttons}}}
    </div>
  {{/if}}
{{/if}}
The wallet buttons appear on the PDP as follows:

For Cornerstone themes below version 6.7
In themes below version 6.7, you need to perform another step to make wallet buttons work as expected. After you enter the preceding code snippet, insert the following code into your theme markup:
{{#if this.with_wallet_buttons}}
  {{#if wallet_buttons}}
    <div class="your-class-for-wallet-buttons-list">
      {{{wallet_buttons}}}
    </div>

    <script type="text/javascript">
      function updateProductDetailsData(form) {
        const productDetails = {};
        const formData = new FormData(form);

        for (const [fieldName, fieldValue] of formData) {
          if (fieldName === 'product_id') {
            productDetails.productId = Number(fieldValue);
          }

          if (fieldName === 'qty[]') {
            productDetails.quantity = Number(fieldValue);
          }

          if (fieldName.match(/attribute/)) {
            const productOption = {
              optionId: Number(fieldName.match(/\d+/g)[0]),
              optionValue: fieldValue,
            };

            productDetails.optionSelections = productDetails?.optionSelections
              ? [...productDetails.optionSelections, productOption]
              : [productOption];
          }
        }

        document.dispatchEvent(new CustomEvent('onProductUpdate', {
          bubbles: true,
          detail: { productDetails },
        }));
      }

      function resetProductDetailsData() {
        const productDetails = {};

        document.dispatchEvent(new CustomEvent('onProductUpdate', {
          bubbles: true,
          detail: { productDetails },
        }));
      }

      function init() {
        const form = document.querySelector('form[data-cart-item-add]');
        const submitButton = form.querySelector('input[type="submit"]');
        const walletButtonsContainer = document.getElementById('bc-smart-payment-buttons');

        if (!walletButtonsContainer) {
          return;
        }

        const submitObserver = new MutationObserver(((mutations) => {
          mutations.forEach((mutation) => {
            if (mutation.type === 'attributes') {
              if (!mutation.target.disabled && form.checkValidity()) {
                walletButtonsContainer.style.display = 'block';
                updateProductDetailsData(form);
              } else {
                walletButtonsContainer.style.display = 'none';
                resetProductDetailsData();
              }
            }
          });
        }));

        submitObserver.observe(submitButton, { attributes: true });

        form.addEventListener('click', () => {
          setTimeout(() => updateProductDetailsData(form), 0);
        });

        form.addEventListener('change', () => {
          if (form.checkValidity() && !submitButton.disabled) {
            walletButtonsContainer.style.display = 'block';
            updateProductDetailsData(form);
          } else {
            walletButtonsContainer.style.display = 'none';
            resetProductDetailsData();
          }
        });

        form.addEventListener('touchend', () => {
          setTimeout(() => updateProductDetailsData(form), 0);
        });

        form.addEventListener('keyup', () => updateProductDetailsData(form));

        if (form.checkValidity() && !submitButton.disabled) {
          updateProductDetailsData(form);
        } else {
          walletButtonsContainer.style.display = 'none';
          resetProductDetailsData();
        }
      }

      init();
    </script>

  {{/if}}
{{/if}}