Customer Login API
Introduction
In this tutorial, you will learn how to enable single sign-on for storefront customers using the Customer Login API and JSON Web Tokens.
You can also use the GraphQL Storefront API to authorize your application to work with customer-specific storefront data.
Overview
Single sign-on (SSO) is an authentication mechanism that enables users to sign in to multiple software applications using the same set of credentials that the user enters only once. It eliminates the need to maintain multiple passwords, which streamlines the process of accessing web applications. For more details, see Single Sign-On (opens in a new tab).
When a user signs into your web app, you can use the Customer Login API to authenticate the user to your BigCommerce store through SSO.
You can use the Customer Login API in the following use cases:
- Integrate with an SSO provider or identity provider (IdP)
- Set up continuous login between a BigCommerce store and another application
- Enable alternative sign-in methods (ex. phone number and SMS password)
Storefront customers are signed in using the access point URL /login/token/{token}. The {token} must be a JSON Web Token (JWT) containing parameters for the customer login request signed by your application’s OAuth client secret. For more information on the OAuth protocol, see OAuth (opens in a new tab).
JWT is an industry standard (RFC 7519 (opens in a new tab)) for securely transmitting information between two parties. A JWT is a sequence of base64url-encoded strings separated by dots (.). The sections include the header, payload, and signature. For more details, see Introduction to JSON Web Tokens (opens in a new tab).
Customer Login JWT payload reference
| Field Name | Type | Description |
|---|---|---|
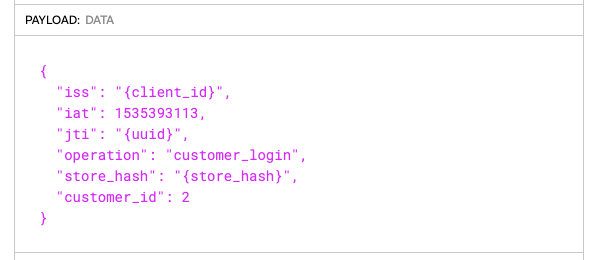
iss | string | The issuer; The API account's client ID. |
iat | integer, UNIX time | The issued at time; when the JWT was issued. |
jti | string, UUID | The JWT ID; a unique identifier for the JWT. |
operation | string | The value is always customer_login |
store_hash | string | The store hash identifying the store the shopper is signing in to. |
channel_id | integer | Optional field containing the channel_id corresponding to the storefront the shopper is signing in to. Depending on your implementation, omitting the channel_id can lead to CORS errors; for example, see Managing Carts. You must include the channel_id when using JWTs to embed checkout on a headless storefront. The default channel_id value is 1. |
customer_id | integer | The ID of the shopper who is signing in. |
redirect_to | string | Optional field containing a relative path for the shopper's destination after sign-in. Defaults to /account.php. |
request_ip | string | Optional field containing the expected IP address for the request. If provided, BigCommerce will check that it matches the browser trying to sign in. |
enable_persistent_cart | boolean | Optional field specifying whether or not to use persistent cart functionality on customer token login. This feature depends on you enabling the Persistent Cart (opens in a new tab) setting on your store. The default value is false. The system ignores this value if you use the server-side GraphQL JWT login mutation. |
Prerequisites
To enable SSO using the Customer Login API, you will need the following:
- A BigCommerce store
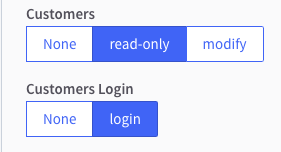
- API client ID and client secret with the OAuth Scope set to Customers Login
- Node.js (opens in a new tab) installed on your machine if you plan to use JavaScript
Be sure to set the Customers Login scope to Login.

API account notes
- This endpoint requires store-level API account credentials. For more information about generating accounts, consult the Guide to API Accounts.
- The app you create needs to be installed or published on a store to be able to generate store-level access tokens. All you would need are the client ID and client secret. See the section on client ID-based authentication in the Authentication tutorial.
Enable single sign-on
To sign a customer in to their storefront account using the Customer Login API, your app needs to redirect the customer’s browser to the following access point URL: https://storedomain.com/login/token/{token}.
The {token} parameter is the JWT containing the payload data signed by your app’s OAuth client secret.
We recommend writing a script to generate a login token since the JWT’s iat (issued at) claim is only valid for 30 seconds. BigCommerce supplies helper methods for generating login tokens in our API Client Libraries.
The beginning of this tutorial focuses on manually creating a token using the debugger tool at JWT.io (opens in a new tab). Then, we will explore how to use a JavaScript function to programmatically generate an access point URL.
Create JWT using the debugger tool
To create a JWT, you will need to obtain a customer_id using the Customers v3 API.
- Send a
GETrequest to the Get All Customers endpoint. Choose a customer and make note of thecustomer_id.
{
    "accepts_product_review_abandoned_cart_emails": true,
    "authentication": {
      "force_password_reset": false
    },
    "company": "BigCommerce",
    "customer_group_id": 2,
    "date_created": "2020-02-06T17:46:33Z",
    "date_modified": "2020-02-07T19:58:03Z",
    "email": "customer@email.com",
    "first_name": "Jane",
    "id": 1,    // customer_id
    "last_name": "Doe",
    "notes": "",
    "phone": "",
    "registration_ip_address": "",
    "tax_exempt_category": "D"
}-
Open the debugger at JWT.io (opens in a new tab).
-
In the "HEADER" field, make sure the JWT
alg(algorithm) field is set to"HS256"and thetyp(token type) field is set to"JWT".

- In the "PAYLOAD: DATA" field, create a payload.

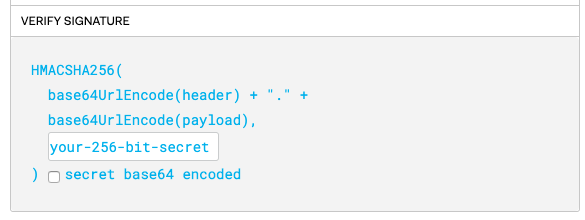
- In the "VERIFY SIGNATURE" field, replace “your-256-bit-secret” with your Client Secret.

- Copy the login token from the encoded box and paste it into the access point URL, replacing the
{token}parameter.
Example:
https://storedomain.com/login/token/eyJhbGciOiJIUzI1NiIsInR5cCI6IkpXVCJ9.eyJpc3MiOiJ7Y2xpZW50X2lkfSIsImlhdCI6MTUzNTM5MzExMywianRpIjoie3V1aWR9Iiwib3BlcmF0aW9uIjoiY3VzdG9tZXJfbG9naW4iLCJzdG9yZV9oYXNoIjoie3N0b3JlX2hhc2h9IiwiY3VzdG9tZXJfaWQiOjJ9.J-fAtbjRFGdLsT744DhoprFEDqIfVq72HbDzrbFy6Is- Paste the URL into the address bar of your web browser.
If the request was successful, you will be signed in as a customer and directed to /account.php. If it was unsuccessful, a sign in attempt error message will be displayed and you will be directed to /login.php.

For common causes of sign-in failure, see Troubleshooting.
Create JWT using a JavaScript function
In this part of the tutorial, we will walk you through creating an access point URL using JavaScript. You will need node.js (opens in a new tab) installed on your machine to complete this section.
- Create and open a new folder by running the following commands in your terminal:
$ mkdir urlGenerator
$ cd urlGenerator- Create a new node project with the following command:
$ npm init- Install jsonwebtoken (opens in a new tab) and uuid (opens in a new tab) npm packages:
$ npm install jsonwebtoken uuid-
Open the
urlGeneratorfolder in your code editor of choice and create a new JS file. -
Paste the following code into the new JS file:
const jwt = require('jsonwebtoken');
const {v4: uuidv4} = require('uuid');

function getLoginUrl(customerId, storeHash, storeUrl, clientId, clientSecret) {
   const dateCreated = Math. round((new Date()). getTime() / 1000);
   const  payload = {
       "iss": clientId,
       "iat": dateCreated,
       "jti": uuidv4(),
       "operation": "customer_login",
       "store_hash": storeHash,
       "customer_id": customerId,
   }
   let token = jwt.sign(payload, clientSecret, {algorithm:'HS256'});
   return `${storeUrl}/login/token/${token}`;
};

const clientId = "Your client id";
const clientSecret = "Your client secret";
const customerId = "Your customer id";
const storeHash = "Your store hash";
const storeUrl = "Your store url";

const loginUrl = getLoginUrl(customerId, storeHash, storeUrl, clientId, clientSecret);
console.log(loginUrl);-
Replace your app and customer-specific values in the variables.
-
Run the code:
$ node youFileName.jsYou should receive a complete access point URL as an output.
- Copy the URL and paste it into the address bar of your browser.
If the request was successful, you will be signed in as a customer and directed to /account.php. If it was unsuccessful, you will receive a sign in attempt error message and be directed to /login.php. For common causes of sign in failure, see Troubleshooting.
Sample code
Helper methods for generating login tokens are provided in our API Client Libraries. See the following BigCommerce repositories for language-specific examples:
For client libraries in other languages, see Libraries for Token Signing/Verification (opens in a new tab).
Signing out
To sign a customer out, set the redirect_to field of the JWT’s payload to /login.php?action=logout.
Troubleshooting
- If the clock of the server generating the “iat” claim is not synchronized, the timestamp will be out of sync and the request will fail. If your system’s time is different from the BigCommerce server time, you can use the Get System Timestamp endpoint as a source of truth.
- You can only visit the access point URL once. The token will be invalidated after the
GETrequest is made. - Tokens should not be generated in advance. Instead, the app should generate the token and immediately redirect the user’s browser to the access point URL.
Related resources
Articles
- Authenticating BigCommerce’s REST APIs
- BigCommerce APIs Quick Start
- Introduction to JSON Web Tokens (opens in a new tab)